How to properly import variations

Understanding Square Variations #

Overview of Square Variations #

Square variations allow you to offer multiple options for a single product, such as different sizes or colors. These variations are essential for providing a comprehensive shopping experience, as they enable customers to find exactly what they need without confusion.

Importance in E-commerce #

In e-commerce, the ability to manage variations effectively can lead to increased sales and customer satisfaction. It simplifies inventory management and ensures that product listings are accurate and up-to-date, thereby reducing the likelihood of stock issues or customer complaints.

Setting Up Your Square Dashboard #

Accessing the Square Dashboard #

To get started, log in to your Square account and navigate to the Square Dashboard. This is your control center for managing all aspects of your Square account, including item variations.

Navigating the Items Section #

Once in the dashboard, click on the “Items” tab. This section allows you to manage your inventory, including creating and editing item variations.

Creating Item Options in Square #

Steps to Create Item Options #

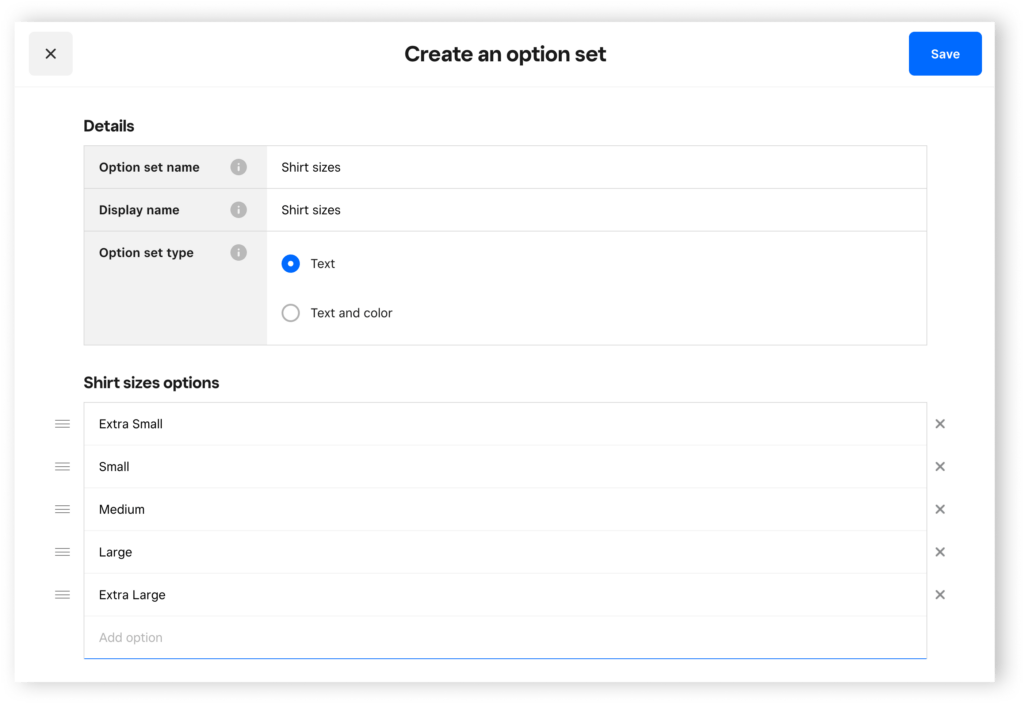
  1. Navigate to Items: From your online Square Dashboard, click on “Items” and then “Options.”
  2. Create an Option Set: Click “Create an option set.”
  3. Enter Details: Fill in the Option set name and Display name.
  4. Select Set Type: Choose the appropriate set type based on your needs.
  5. Enter Option Information: Input the various options, such as sizes or colors.
  6. Save: Click “Save” to create the option set.

Best Practices for Naming and Display

  • Consistency: Ensure that option names are consistent across your inventory.
  • Clarity: Use clear and descriptive names to avoid confusion.
  • Organization: Group similar options together for better management.
image

Adding Option Sets to Items #

Selecting Items

From the Items section, select the item you want to add options to. This opens the Edit Item view.

Associating Option Sets with Items

  1. Select Options: Click “Add Options.”
  2. Choose Option Set: Select an option set from the list or create a new one.
  3. Review and Confirm: Review the new variations and click “Create Variations” to confirm.
  4. Save: Click “Save” to apply the changes.
image 2

Managing Option Sets #

Editing Option Sets

To edit an existing option set:

  1. Navigate to the Items section and select the relevant item.
  2. Click on the option set name to open the Edit Option view.
  3. Make the necessary changes and click “Save.”

Deleting Option Sets

  1. From the Edit Item view, click the three dots (•••) next to the option set name.
  2. Select “Remove option set.”
  3. Review the variations that need to be deleted and click “Delete Variations” to confirm.
  4. Click “Save.”

Converting Existing Variations to Options #

Identifying Existing Variations

Review your item library to identify items with existing variations that you want to convert to options.

Steps to Convert Variations

  1. Select Item: Choose the item you want to edit.
  2. Add Options: Click “Add Options.”
  3. Choose Option Set: Select or create the appropriate option sets.
  4. Assign Options: For each variation, choose an option that describes it.
  5. Save: Click “Save” to apply the changes.

Adding New Variations to Items #

Creating New Variations

  1. Select Item: From the Item Library, select the item to edit.
  2. Add Options: Click “Add Options.”
  3. Choose Option Set: Select or create the appropriate option sets.
  4. Assign Options: For each new variation, choose an option that describes it.
  5. Save: Click “Save” to finalize the additions.

Assigning Options to Variations

Ensure that each variation accurately reflects the options you have created. This may include specifying sizes, colors, or other attributes relevant to your products.

Removing Options from Items #

Steps to Remove Options

  1. Edit Item: From the Edit Item page, click “Edit” next to the option set name.
  2. Remove Option: Click the “X” next to the option you want to remove.
  3. Review and Confirm: Click “Done,” review the changes, and then click “Delete Variation.”
  4. Save: Click “Save” to apply the changes.

Managing Deleted Variations

Ensure that all deleted variations are accurately removed from your inventory to prevent any discrepancies in your product listings.

Syncing Variations with WooCommerce #

Overview of SquareSync for Woo

SquareSync is a powerful tool that allows you to import your Square variations into WooCommerce seamlessly, ensuring your online store is always up-to-date.

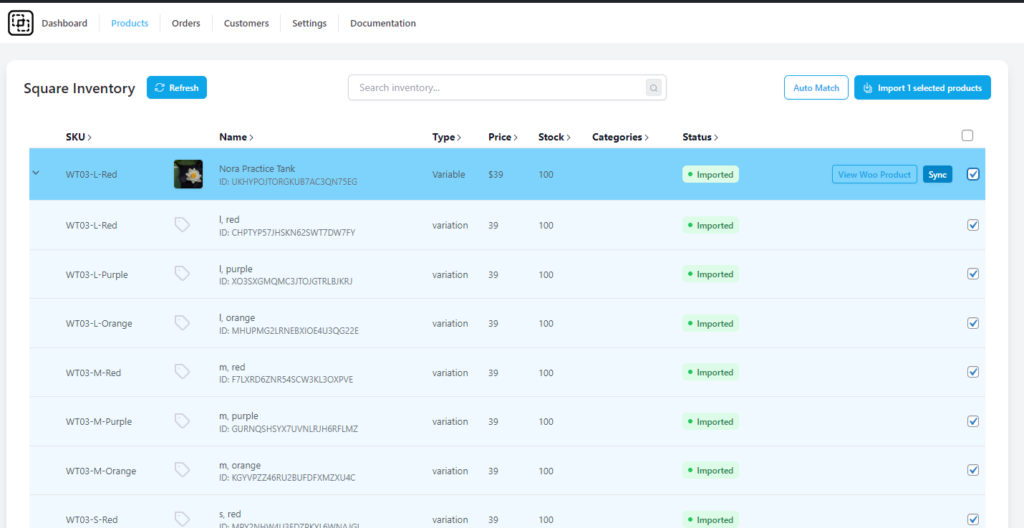
Importing Variations into WooCommerce

  1. Navigate to Products: In your WooCommerce dashboard, go to the Products tab.
  2. Select Variable Products: Choose the variable products you want to import.
  3. Choose Variations: Select the specific variations to import.
  4. Import: Use SquareSync to transfer the data into WooCommerce.
Importing Square Variations to WooCommerce

Troubleshooting Common Issues #

Resolving Sync Errors

  • Check Connections: Ensure that your Square and WooCommerce accounts are properly linked.
  • Review Logs: Look at sync logs to identify and resolve issues.
  • Contact Support: If problems persist, reach out to Square or WooCommerce support for assistance.

Handling Missing Variations

  • Verify Data: Check that all variations are correctly set up in Square before syncing.
  • Re-Sync: Attempt to re-sync the items if any variations are missing.
  • Manual Adjustments: Make manual adjustments in WooCommerce if necessary.

Tips for Efficient Product Management #

Automating Updates

Utilize automation tools to keep your inventory and variations up-to-date without manual intervention.

Regular Audits and Checks

Perform regular audits of your product listings to ensure accuracy and completeness. This helps prevent errors and ensures a smooth shopping experience for your customers.

FAQs #

How do I create an option set?
Navigate to the Items section in your Square Dashboard, click on Options, and then Create an option set. Fill in the details and save.

Can I edit option sets after creation?
Yes, you can edit option sets by selecting the item, clicking on the option set name, making the changes, and saving them.

How do I delete a variation?
From the Edit Item view, click the three dots next to the option set name, select Remove option set, review and confirm the deletions, and save the changes.

What if a variation does not sync?
Ensure your Square and WooCommerce accounts are properly linked, check the sync logs for issues, and try re-syncing. Contact support if the problem persists.

How do I manage global attributes in WooCommerce?
After importing variations, assign them to global attributes in WooCommerce for consistent management across multiple products.

Is there a way to automate SquareSync?
Yes, automation tools can help keep your Square and WooCommerce accounts synchronized without manual intervention.

Conclusion #

Managing product variations across Square and WooCommerce doesn’t have to be complicated. By following this guide, you can efficiently create, edit, and sync item options, ensuring a seamless shopping experience for your customers. Regular audits and leveraging automation tools will further streamline your process, allowing you to focus on growing your business.

What are your feelings
Updated on 6 August 2024